|
you have Guest user access (not logged in)
|
||
      visitors since May 2003 ClubSite © ver 1.3 |

|
|
click here to return to the gallery list
|
Fuel
Tank Shelf on Viking 26 Aft Cabin ' Blue Skies'
|
||||||
|
Tools
and materials required:
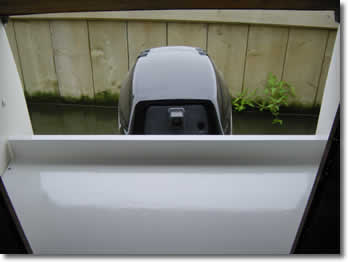
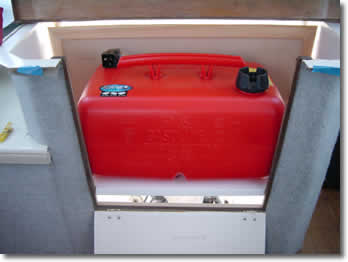
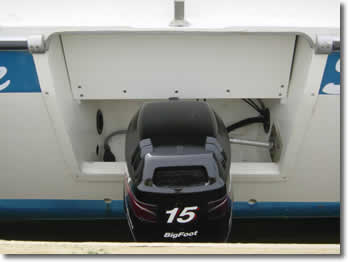
Jig saw, screwdriver, tape measure, hole cutter 2", paint brush, 'No more nails' glue, s/s bolts, paint. Blue Skies is our new boat based on the Norfolk Broads at Acle. When we purchased her a month and a half ago I was surprised to find the 25 litre fuel tank was placed in a locker under the rear berth! The smell of petrol in the locker from the fuel vent made me decide that it should be moved out of the locker into a better ventilated area. Where was the next question, the engine well look like it would take the tank so I set to and fitted an MDF shelf on bearers bolted to the sides. To provide shade so the fuel tank would not be in full sun (if we ever get any this year!) I made a loose fitting back mounted on the shelf. This loose fit allows for plenty of ventilation round the tank and no smell of petrol in the aft cabin. Construction is straight forward, I mounted the bearers first and took the measurements for the shelf from them as the well tapers down, the shelf was cut from a sheet of MDF (15mm) and a strengthening bar was fitted across the back, this also provide a mounting point for the back panel which was also cut from a sheet of MDF (3mm) this was stiffened with a trim of softwood strip. The whole lot was then given a couple of coats of paint. I was lucky enough to have a neighbour get the back panel sprayed which has given it a glass fibre look. The shelf is easily removed for maintenance on the engine by undoing the 6 s/s screw that pass through the shelf into the bearers. This has now provided me with an empty locker, just the place to move the battery to and with space to fit a second battery… the next job to be done. Here are a few photos:-
(Many
thanks to John for his kind permssion to include his © photos and
text on this site) |
||||||